 DarwinMail
Hello and welcome to DarwinMail. I built DarwinMail because I was tired of wasting so much time managing my emails (which are also often my to-do's) on a daily basis.
I'd check my emails 30+ times, every day. It was demanding & nerve-racking. I knew there had to be a better way. I wanted email to work for me, instead of the other way around. DarwinMail is the result of this need.
DarwinMail is fast, elegant & simple. Become 5x more productive by using DarwinMail through multiple accounts, bundles, reminders, snoozing, templates, bulk actions, and more.
The following is a list of the permissions DarwinMail requests when you log in for the first time.
Please feel free to check out the official documentation from Google if you would like to learn more about the permissions that can be requested through the applications they support.
DarwinMail's works in the following four steps:
None of the content of your emails is stored on DarwinMail's servers. There is no need! Think of all the space it would take up and the time that would be spent retrieving the data.
Google's API & servers do the heavy lifting. DarwinMail displays your emails in a simplified manner while providing many useful features.
The following is taken straight from Google's documentation describing the exact process.
"This document also explains how to implement OAuth 2.0 authorisation to access Google APIs from a JavaScript web application. OAuth 2.0 allows users to share specific data with an application while keeping their usernames, passwords, and other information private. For example, an application can use OAuth 2.0 to obtain permission from users to store files in their Google Drives.
This OAuth 2.0 flow is called the implicit grant flow. It is designed for applications that access APIs only while the user is present at the application. These applications are not able to store confidential information.
In this flow, your app opens a Google URL that uses query parameters to identify your app and the type of API access that the app requires. You can open the URL in the current browser window or a popup. The user can authenticate with Google and grant the requested permissions. Google then redirects the user back to your app.
The redirect includes an access token, which your app verifies and then uses to make API requests."
Please feel free to check out the official documentation from Google for further reading.
We respond to every single communication - no matter what channel it was sent through.
We appreciate every single communication and try our very best to fulfill your request as soon as possible. At the end of the day, we want you to love DarwinMail as much as we love building it.
Yes.
DarwinMail and Gmail can be used side by side. If at any point, you decide to stop using DarwinMail, your Gmail Inbox will remain the same except for one difference: there will be five new labels created for DarwinMail - Done, Dustbin, Pinned, Reminders & Snoozed.
While in your Inbox, you can apply the Pinned, Snoozed & Starred labels to your emails.
The Pinned & Snoozed labels are custom DarwinMail labels (which are created when you first log into DarwinMail) that provide the following functionality.
PS: While Gmail implements similar functionality, they do not expose those operations via their API and so we have created a bespoke solution in DarwinMail to provide our own versions of the functionality.
DarwinMail has been tested on the following versions of:
However, this does not mean that DarwinMail does not work on other browsers. In fact, we have had stellar reports from many happy users that utilize a wide range of browsers.
Please feel free to submit any details of feature requests, improvements, or bugs you've spotted via email.
Thank you so much for asking! :)
There are several ways you can help DarwinMail:
Multiple accounts allow you to manage as many accounts as you would like, all from within your DarwinMail inbox.
Email is one of the most prominent forms of communication on the internet today. For many people, having one email account is a privilege, while the rest of us are left to wrestle with a plethora of tools, in an effort to tame our inboxes. Many are left wanting a tool that allows us to do just that.
Multiple accounts have been integrated into DarwinMail to allow you to add any number of email accounts to your single DarwinMail account. Once an account has been added, every email can be accessed and managed at your discretion, in a straightforward and easy-to-use fashion.
Once added, each account can be used;
Click on your account display picture (top right of your inbox on the header bar),
Click ‘Add Account’ (in the menu that opens up),
Select an account from the list that pops up (or log in to an account),
Review and accept the permissions (by clicking the allow button),
You’re all done!
PS: you can follow the above steps to add as many accounts as you would like.
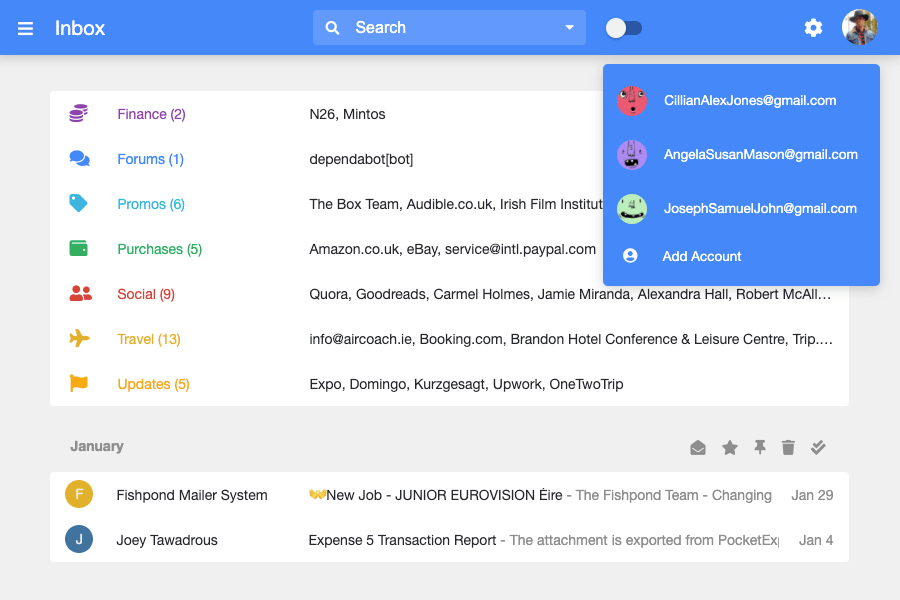
Bundles allow you to combine multiple emails of the same type or from the same sender into one group in your inbox.
It’s common to receive tens, if not hundreds, of emails every day. In many cases, you may even be receiving much much more. All of these emails are received one by one and we are alerted via separate notifications.
These emails are then displayed in a lengthy list in our inbox. This is, of course, a lot to deal with and something which we don’t have to deal with in the first place. That is if we had a better way to manage all those emails.
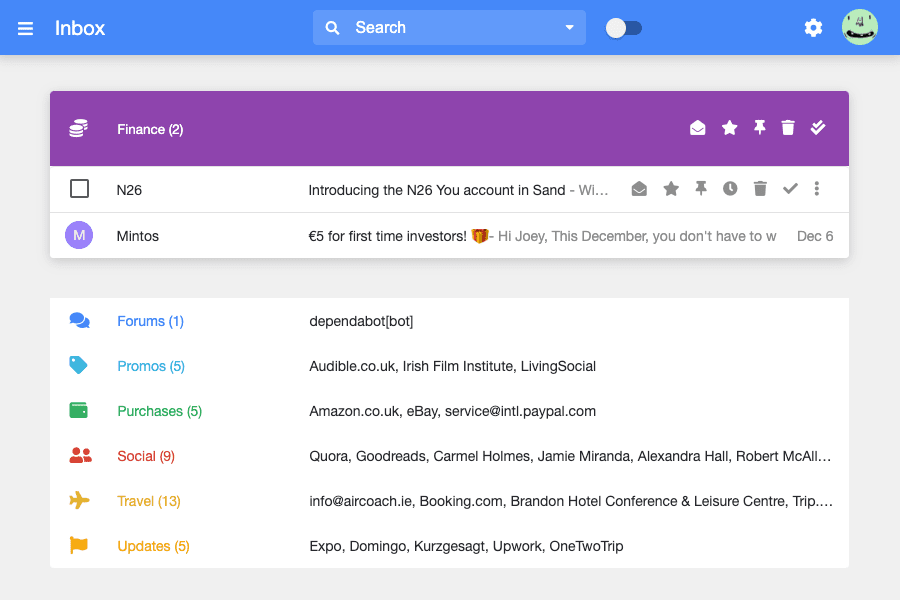
Instead of having the hassle of dealing with all your emails one by one, you can group emails with common types or senders in your inbox. Now you can easily view all the emails for your upcoming trip in one place.
You can arrange all your cryptocurrency transactions, research, and material in one neat bundle. You can combine all social media emails into one bundle to vastly reduce the digital clutter it usually creates.
Bundles can be used in two ways: at the bundle level and the email level.
Here, we have two types: DarwinMail bundles and user bundles.
DarwinMail bundles are the bundles that we have built into DarwinMail.
User bundles are the custom bundles that you can create yourself.
Here, we have two types: DarwinMail bundles and user bundles.
DarwinMail bundles are the built-in bundles you can bundle a specific email into.
User bundles are the non built-in bundles, which are specific to your email account, that you can bundle a specific email into.
Hover over a thread in your inbox,
Click on the ellipsis icon (far right of the icons that appeared on the thread you hovered over),
Modify where you would like (or not like) to bundle your emails (via the DarwinMail or user bundles listed),
Toggle on/off bundles,
You’re all done!
Templates allow you to create various pre-made emails, that you can use over and over when sending emails.
Over the course of our week we often send the same kinds of emails over and over. The recipients may change, but the content of the emails that we are sending often follows the same blueprint.
There's absolutely no reason to be typing up the same kinds of emails over and over. With our templates feature, you can define as many templates as you wish for as many different kinds of emails as necessary. Each template can be tailored in such a generic fashion, that it can be reused again and again.
Each template has a name and a body. You create/read/update/delete them from the templates editor (modal), and you add them in the compose editor.
Click on the settings icon (top right of your inbox on the header bar),
Click 'Templates',
Create as many templates as you wish,
Click the compose button (bottom right of your inbox),
Click the plus button to add your desired template (the right-most button in the row of buttons),
You’re all done!

Reminders allow you to take note of things you do not want to forget but do not want to deal with right away.
There has to be over 1000 things that we each have to do on a daily basis. Not only do we feel stressed that we can't get all those things done, it's often the case that those extra todos are still on our mind weighing us down.
Clear your mind from the mental clutter of an ever-growing to-do list. Jot down the things you want to get done (just not right now). Focus your attention on the tasks at hand that you feel are the most important.
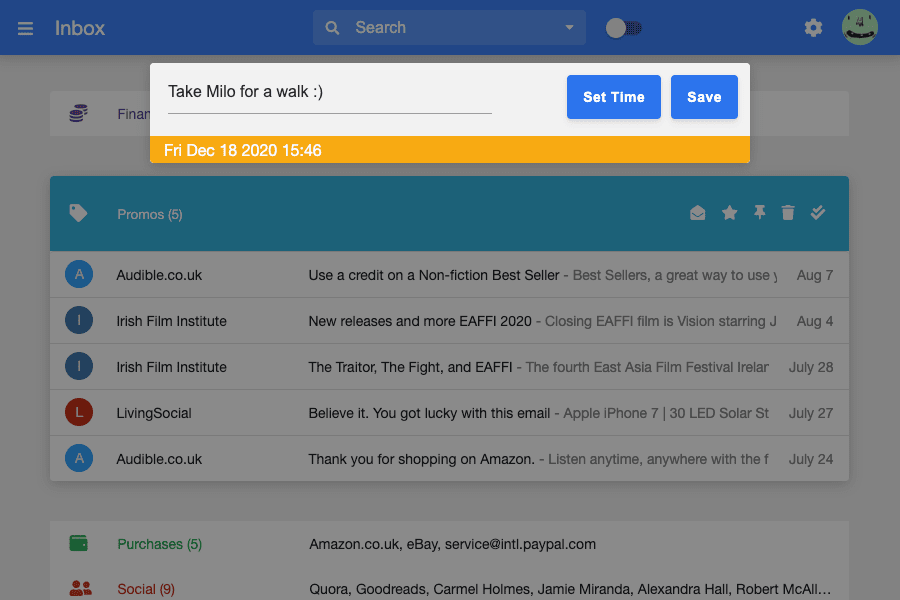
Each reminder has a note and a DateTime. You create them from the reminders modal. You read/update/delete them from your 'Reminders' sidebar label. Once their time has come, the reminder will move to your Inbox and you will be sent a notification.
To create a reminder:
Click on the note button (bottom right of your Inbox, just above the compose button),
Enter the note and datatime for your reminder,
Click the 'Save' button,
You’re all done!
To read/update/delete a reminder:
Click on the 'Reminders' label (in your Inbox's left sidebar menu),
Read/update/delete as many reminders as you wish,
You’re all done!
Snoozed email is a feature that allows you to hide as many emails as you wish, until a later date and time.
It's difficult to deny that we all receive a great number of emails on a daily basis. While some of us get off lightly while others have a lot to deal with, there is one constant. We often struggle with prioritizing which emails to deal with immediately, when faced with so many emails, to begin with.
With DarwinMail's snoozing function, you can hide as many emails as you wish, until such a time as they should be handled. Snoozing helps you to get through the noise, so you can deal with what is most urgent or important right now.
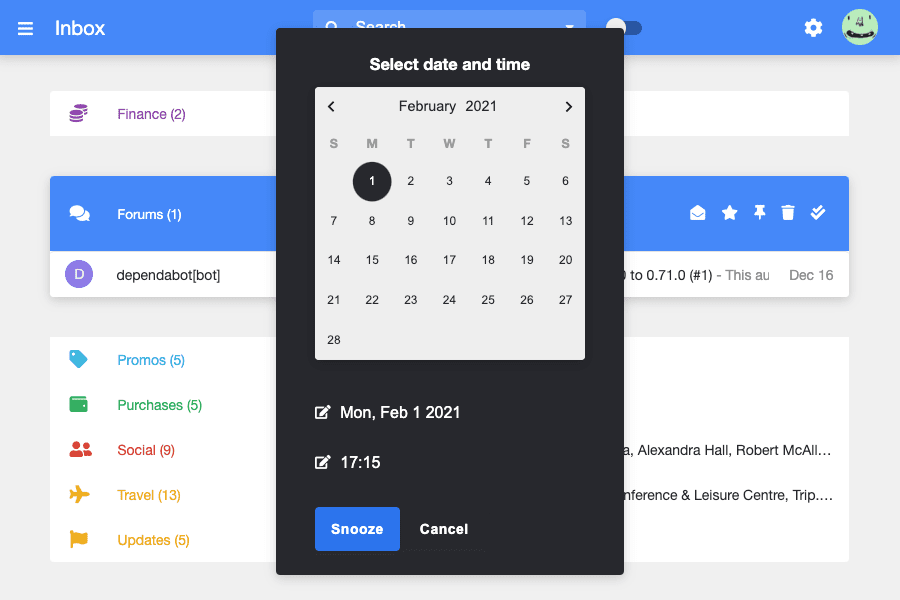
Every email can be snoozed, essentially making it disappear from your Inbox. When snoozing an email, simply select the DateTime upon which you want it to re-appear in your Inbox (at which point you will also receive a notification).
To snooze an email:
Hover over any email (to show the actions bar on that specific email),
Click the clock icon,
Select a DateTime to snooze that email until,
You’re all done!
To read/update/unsnooze an email:
Click on the 'Snoozed' label (in your Inbox's left sidebar menu),
Read/update/unsnooze as many reminders as you wish,
You’re all done!
Bulk actions allow you to perform an action (mark as unread/mark as read/star/pin/snooze/delete/archive(mark as done)) on multiple emails in one go.
Many of the emails we receive on daily basis are of a similar nature. As a result, many of these emails warrant the same action being applied to them. One. By. One... usually.
Instead of applying the same action to multiple emails over and over, you can apply multiple (or bulk!) actions to a group of emails. Combine bulk actions with our bundles feature and act upon 100's of emails, 1000's of emails, or even more with one swift action.
Every bundle (both DarwinMail and user-created) can be used to apply bulk actions to every email within that bundle. Bulk actions can also be applied on groups of time frame emails (emails you see in your Inbox grouped under headings such as 'Today', 'Yesterday', 'Last Month' etc).
Via bundles:
Hover over any bundle (to show the actions bar on that specific bundle),
Click on any action,
You’re all done!
Via time frames:
Click on any time frame bulk action (in your Inbox, on the right of 'Today', 'Yesterday', 'Last Month' etc),
You’re all done!
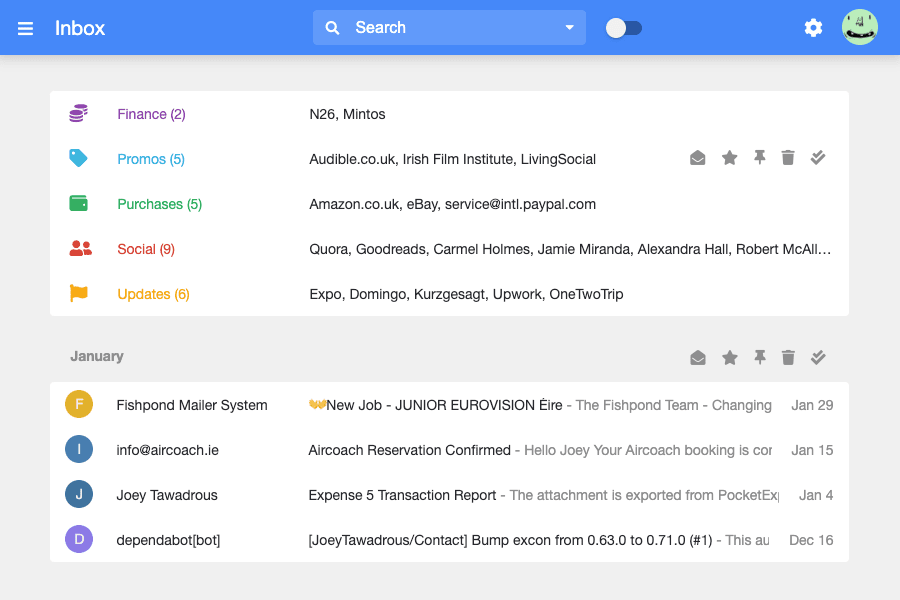
Dark mode enables you to turn the lights off, so to speak, in your Inbox. This changes the entire UI and all its elements into using a dark template.
You can (your eyes included) sometimes get tired of viewing all of the user interface (UI) elements in the same colors over an extended period of time. Sometimes, it's nice to change the UI template (and all UI components) in order to create a fresh new look.
This fresh new look also allows your eyes to rest. Our eyes are not strained as much when we are looking at dark colors over extended periods of time.
Once turned on, dark mode will convert your entire Inbox, including all UI components, into their dark mode equivalents.
Click on the settings icon (top right of your inbox on the header bar),
Click 'Settings',
Click the 'Design' tab,
Click the dark mode switch,
You’re all done!
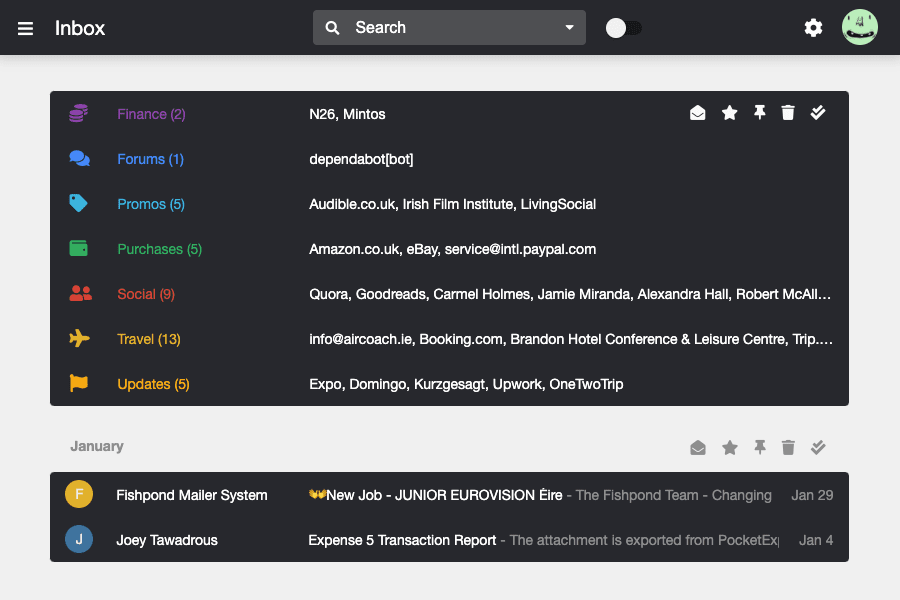
Undo send allows you to recall an email you just sent.
Picture this: you just typed up a very large email for a client, detailing everything down to the smallest detail. Surely they will appreciate the email when it's received. Right?.. wrong! You forgot to add the attachments.. that you said you had attached in the email!
If you want a quick and easy way to recall the message you just sent then undo send has you covered. It's typical that we only remember we didn't add that attachment right after we have hit the send button! However, with undo send, we don't have to worry about being stuck with having to send a follow-up email anymore.
Once you send an email, a small message will appear on the bottom left of your Inbox. In that message, there will be an 'Undo Send' button. Upon clicking that button, your message will be recalled and moved into your Drafts.
Click on the settings icon (top right of your inbox on the header bar),
Click 'Settings',
Click the 'Emails' tab,
Select your 'Undo send timeframe' from the dropdown provided,
You’re all done!
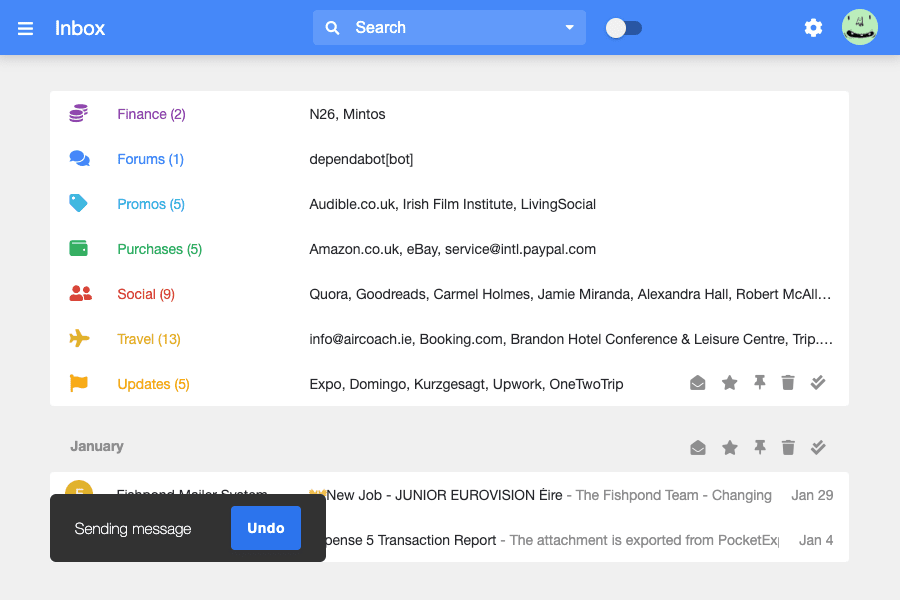
Swipe actions allow you to swipe and email/bundle left/right to perform an action (mark as unread/mark as read/star/pin/snooze/delete/archive(mark as done).
Swipe actions offer another method for carrying out actions (be it for individual emails or multiple emails in bundles). They are especially helpful on mobile devices.
Being able to use swipe gestures or actions on an email or bundle makes it very quick and easy for us to carry out single or bulk actions on our emails.
Swiping left or right on an email or bundle will show the swipe actions. Once an action is clicked, that action will be applied to the email (if an email was swiped) or to all emails in the bundle (if a bundle was swiped).
Swipe left/right on an email/bundle (this will show you the swipe actions),
Click on an action,
You’re all done!
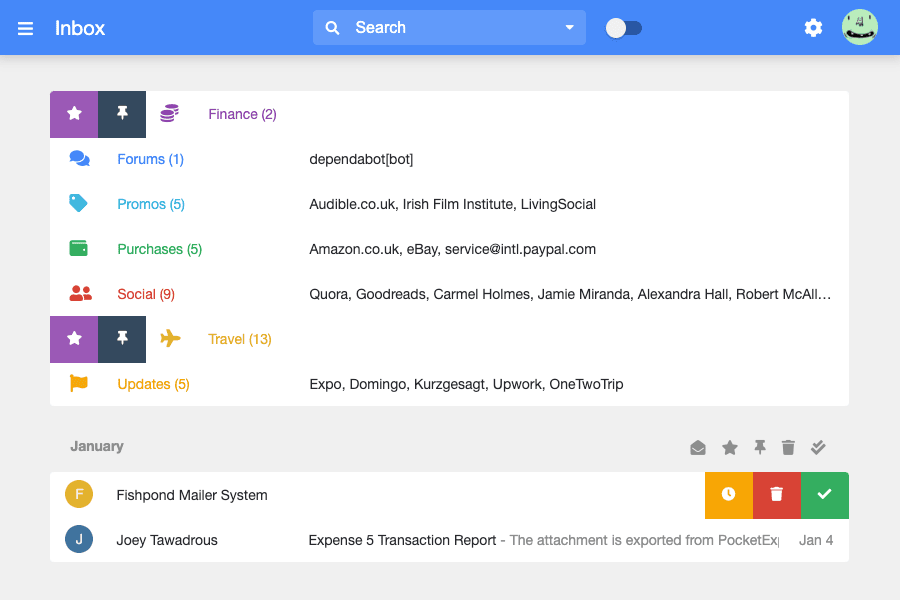
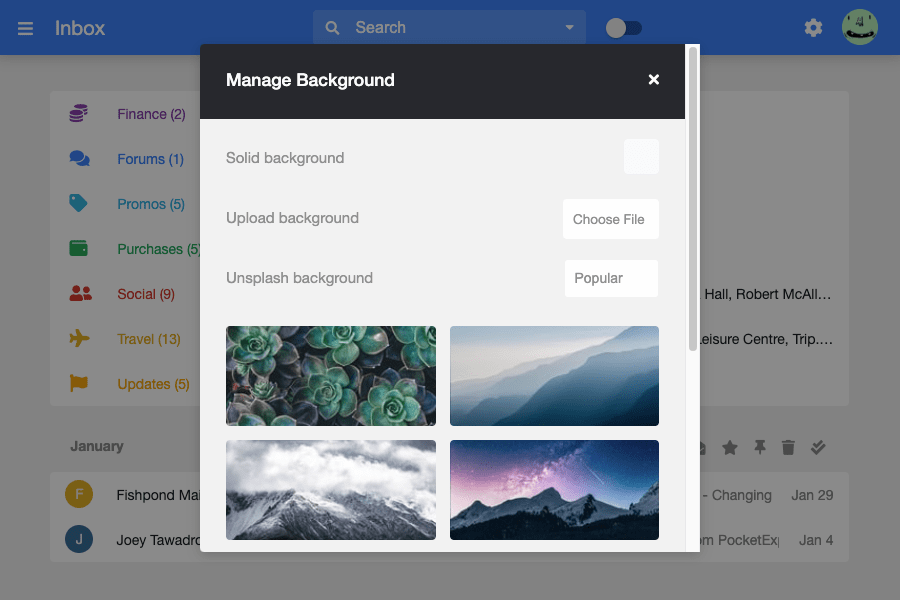
Custom backgrounds allow you to change the default look of your Inbox.
We all have our own unique tastes and preferences. This should be celebrated in software and that's why custom backgrounds were added to DarwinMail.
Custom backgrounds allow you to add some flair to your Inbox. Choose any background color or background image you like from a very large collection of images (from Unsplash) to upgrade & customize your Inbox.
You can either choose a solid background color or a background image from the 'Popular' or 'Latest' categories on Unsplash. Your background color or image can be chosen from our custom backgrounds editor.
Click on the settings icon (top right of your inbox on the header bar),
Click 'Settings',
Click 'Background',
Select your solid color or choose an image from Unsplash,
You’re all done!
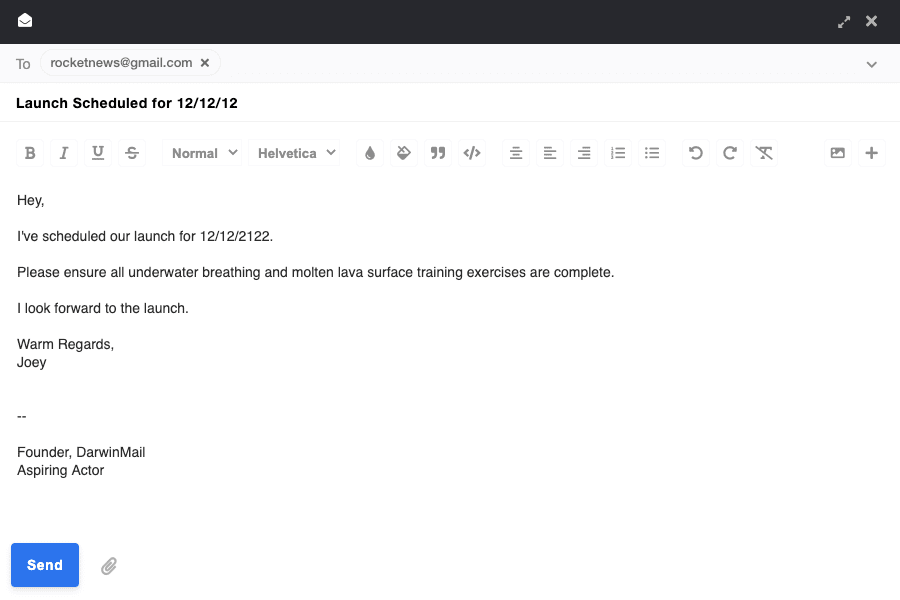
Distraction-free mode allows you to compose your emails in peace and serenity, by removing 99% of UI elements around the compose editor.
Sometimes all the bells and whistles in an email tool can be distracting when you're trying to write your emails. There is a better way!
Distraction-free mode helps you by removing all of the distracting elements around your compose window, allowing you to focus on writing your email.
Once you open your compose editor, there is a button that allows you to resize your compose editor to expand and fill up the entire Inbox screen.
Click the compose button (bottom right of your inbox),
Click the arrow button to enable distraction-free compose (the second button from the right on the top black bar, next to the x icon),
You’re all done!
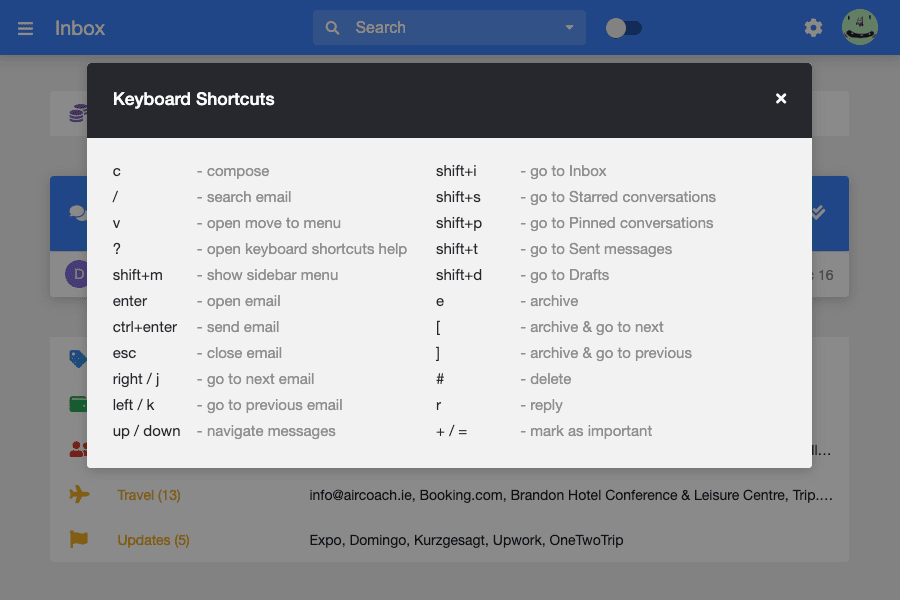
Our advanced keyboard shortcuts allow you to quickly perform a wide range of actions in your Inbox from the press of a button (or pair of buttons!).
It's often far more convenient to perform a large number of actions in quick succession with keyboard shortcuts, rather than navigating around your Inbox to perform the actions via clicks of your mouse.
Our advanced keyboard shortcuts greatly increase your efficiency when managing your Inbox, removing the need to use your mouse for a wide variety of Inbox actions.
Simply press to required keyboard combo to perform the action.
Press the '?' (from anywhere in your Inbox to view to hotkeys window),
Choose the hotkey you would like to perform from the list,
Press the key combo you selected from the hotkeys list! (after you have closed the hotkey window, of course),
You’re all done!
To connect your email account (via IMAP) you will need your email address and your app password.
An app password is a password you can use to login to your email via IMAP. App passwords are more than regular passwords as they are linked to a specific app and can be revoked at any time.
Go to the Fowarding and POP/IMAP tab in your Gmail settings.
In the 'IMAP Access' section, click Enable IMAP.
Click Save Changes button.
Go to the security tab in your Google account.
In the 'How you sign in to Google' section, click 2-Step Verification.
Click Turn on 2-Step Verification.
Go to the security tab in your Google account.
In the 'How you sign in to Google' section, click 2-Step Verification.
In the 'App passwords' section, click the arrow to create a new app password.
Enter the app name for the app password and click create.
Follow the steps listed in the Microsoft docs to connect your Hotimail account.
Follow the steps listed in the Apple docs to connect your iCloud account.
We do not currently support other kinds of IMAP accounts but please send us an email if you would like to make a request.
Clicking the green checkmark button will archive & mark your email(s) as done (this is the same as sweeping).
Once archived & marked as done, your email(s) will be removed from your Inbox and into your Done label.
They will also retain their bundles, so they will still be visible in their respective bundles that they were assigned to.
Simply send us an email! Our email address is darwinmailapp at gmail dot com.
If you have any other queries whatsoever, please feel free to email us. Our email address is darwinmailapp at gmail dot com.
Please submit all feature requests and improvements via email.
Thank you very much for your interest in DarwinMail.
If you have an issue and want to help us debug it, please:
Right-click -> press inspect -> click the Console button
Take a screenshot of your console log
Send an email with the screenshot and error details to darwinmailapp@gmail.com
We will be able to figure out your issue then!
You can view a sample screenshot with instructions here.
If you're feeling generous and would really like to help us out a lot.. and I mean A LOT!.. you could leave us a positive review on Trustpilot :)
Social Media
Please feel free to share feedback on Twitter or Reddit :)